23andMe API Authentication
23andMe provides an API that allows customers to access their genome data programmatically, but access to the API is safeguarded using the OAuth 2.0 framework. Although the intended audience for 23andMe’s developer API seems to be mobile app developers, it’s still possible to access raw genome data for more academic purposes. On this page, I’ll describe a minimal number of steps to access a customer’s raw genome data through 23andMe’s API.
Please refer to the 23andMe API Terms of Service to determine if your use case is appropriate.
Introduction
A number of steps and technologies are involved in order to access raw genome data through 23andMe’s API. First, we’ll create an account and register an “app” with 23andMe. Then to work through their chosen authentication scheme, OAuth 2.0, we’ll create a couple of PHP scripts that run on a web server. Finally, we’ll create two little Python scripts that downloads some raw genome data.
The majority of this work will involve working with the OAuth 2.0 framework, which is defined in RFC 6749. From the RFC:
The OAuth 2.0 authorization framework enables a third-party application to obtain limited access to an HTTP service, either on behalf of a resource owner by orchestrating an approval interaction between the resource owner and the HTTP service, or by allowing the third-party application to obtain access on its own behalf.
Basically, OAuth 2.0 is the means to access restricted data from 23andMe, and it allows 23andMe to maintain the responsibility of storing and validating customer authentication credentials.
The following flowchart depicts the authentication process we will follow to obtain an access token, which will then be used to access the raw genome data through 23andMe’s API. Details about the individual steps will be described in later sections.

Creating a Developer Account
23andMe automatically creates accounts for its customers so they can browse the 23andMe website and view information about their genome or genomes of profiles associated with their account. To access this same information programmatically, the customer (or app developer) must create a developer’s account at api.23andme.com and register an app.
Although we won’t be creating an app per se, we still need to register an app at 23andMe so we can obtain a client_id and client_secret that will be used during the authentication process. As of June 2014, this information can be found on 23andMe’s API Dashboard. These two credential codes are displayed on the right side of the page; each code is a unique 32-character hexadecimal string.
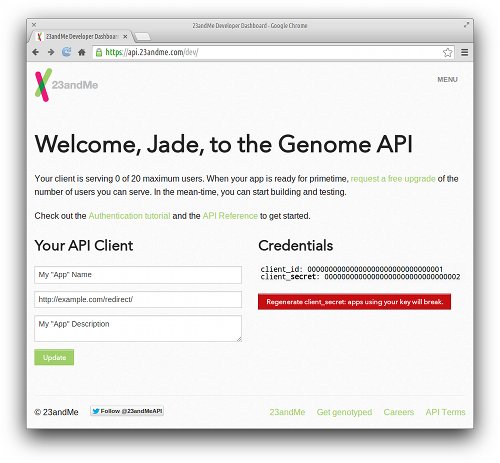
Another important field that we must provide on this dashboard is the Redirect URI. During the authentication process, our browser will be temporarily redirected to 23andMe’s authorization page. When that stage completes, 23andMe will then redirect our browser to this URI, which will in turn perform the final steps of the authentication process. The implementation of this page will be described later, but for now, let’s assume this URI is http://example.com/redirect/.
Initiating the Login
Authentication begins when a browser issues a request to 23andMe. To avoid entering long values into the address bar, we’ll create a simple web page in PHP that redirects the browser to 23andMe’s authorization page along with our app’s client_id and Redirect URI. Let’s assume this file is stored on our web server at http://example.com/login/.